Introducing Broker
A Broker account is described as a master account linked to an individual or to organization client accounts. The master account is used for fee collection, and the broker may open a single proprietary account for trading. The account can be white branded with the broker's corporate identity. The broker has access to most Portal functions and can have multiple users, each with access to different functions and jurisdiction over different client accounts. Clients have access to all trading and Portal functions. Find out more information by reviewing the Guide to Choosing the Right Account page and the What You Need for the Application page.
To open this type of account, follow the steps below.
-
Navigate to www.interactivebrokers.com and select the Open Account button in the top right corner followed by Start Application.

-
Select the Institution tab on the left side and input an Email Address, Username, Password, and Country for this account.

-
Select Create Account to navigate to the next page.
-
Confirm your email address by selecting the blue Confirm button in the top right corner. Select the Business Accounts tab followed by Introducing Broker from the account type drop-down menu.

-
Upon selecting the account type, you will be prompted to enter the Broker Type and Incorporation/Legal Formation (Country and State). Additionally, select "I am the signatory on this account and authorized to review, sign, and submit the application." or "I am starting this application on behalf of the signatory who will later perform the final review, sign and submit the application." Once these have been selected, click Start Application.

-
Enter the Regulatory License Information by selecting "This application is for a brokerage firm that is NOT licensed or registered with any regulatory agency" or "This application is for a brokerage firm that is licensed or registered with a regulatory agency".

-
If you select "This application is for an advisor that is licensed or registered with a regulatory agency", you must enter the Primary Registered/License Country.

-
Enter the Regulatory License Information by selecting the check boxes to the left of the regulators your organization is registered with and providing the necessary information.

-
The next page of the application is the About Your Organization section. Fill this out accordingly and press Continue.

-
The following page is an additional About Your Organization section. Fill this out accordingly and press Continue.

Please note, to the extent required by law, we will take appropriate technical and organizational measures to keep your Personal Information confidential and secure in accordance with our internal procedures covering the storage, disclosure of and access to Personal Information. To review our privacy policy, please click here.
-
On the following page, enter the Authorized Person information and press Continue.

-
The next page is the Chief Compliance Officer section. Enter the information and press Continue.

-
Enter the Money Laundering Reporting Officer information and press Continue.

-
The next page is the Tax Classification section. Enter the information and press Continue.

-
Fill out the Regulatory Information and press Continue.

-
The next page is the Configure Your Trading Account page. Fill this out accordingly and press Continue.
Please note, to add additional products to trade, select the click here hyperlink included in the yellow disclosure.

-
The following page is the Confirm Your Tax Residence section. Fill this out accordingly and press Continue.

-
The Information Required for Applicants Affiliated with Publicly-Traded Companies page will populate next. Fill this out accordingly and press Continue.

-
On the following page, enter the Business Association Disclosure information and press Continue.

-
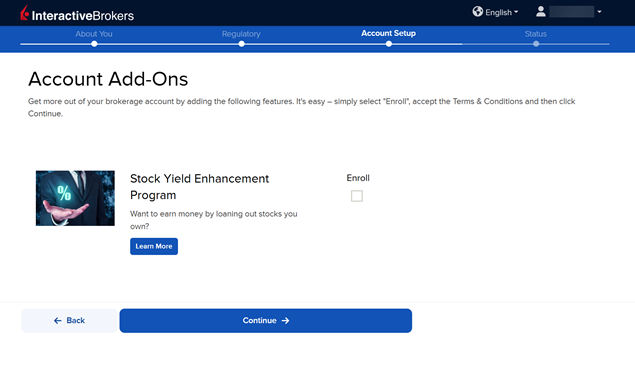
The Account Add-On section will populate on your screen. The Stock Yield Enhancement Program provides extra income on the fully-paid shares of stock held in your account by allowing IBKR to borrow your shares in exchange for collateral (either U.S. Treasuries or cash). IBKR then lends the shares to traders who want to sell them short and are willing to pay a fee to borrow them. To enroll, click the Enroll check-box and press Continue. If you do not want to enroll at this time, leave the check-box blank and click Continue.
-
The next page of the application is the Review & Sign Agreements section. Fill this out accordingly and press Continue.

-
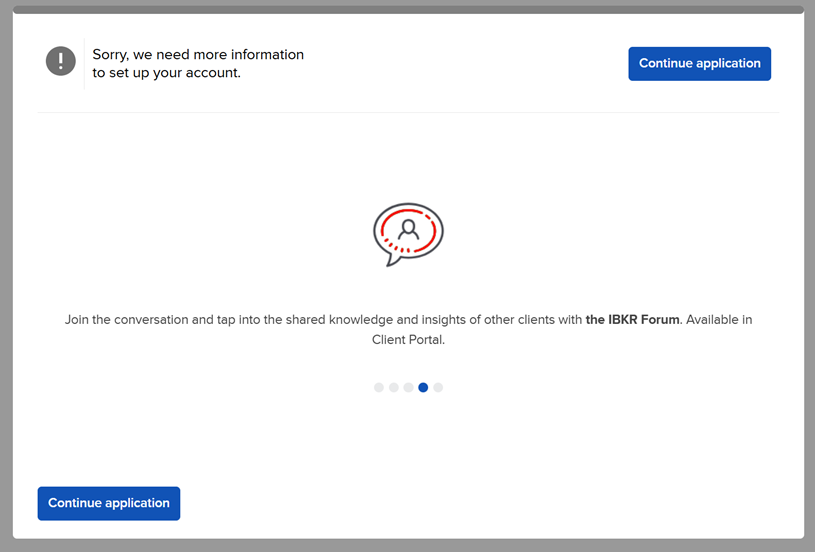
The following pop-up may appear on your screen. Click Continue application.
-
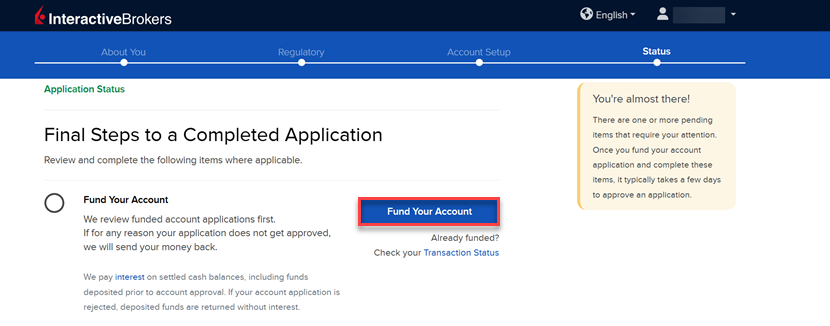
The final page of the application is the Status section. This page will state any additional information or documents needed to complete the application. These tasks are prompted based on the information you previously provided in the application. Any required documents needed for the application will be marked as "REQUIRED" or "Not Yet Received" in red letters. Select the blue buttons to Fund Your Account, Answer Questions, Verify Identity, and Upload Documents.

-
Once all of these steps have been completed, a member of our back office team will review the application and any submitted documents. Once the account has been approved and opened, you will receive an email from Interactive Brokers advising that your account has been activated and you may log in at any time to start trading.
How to Fund Your Account During the Application
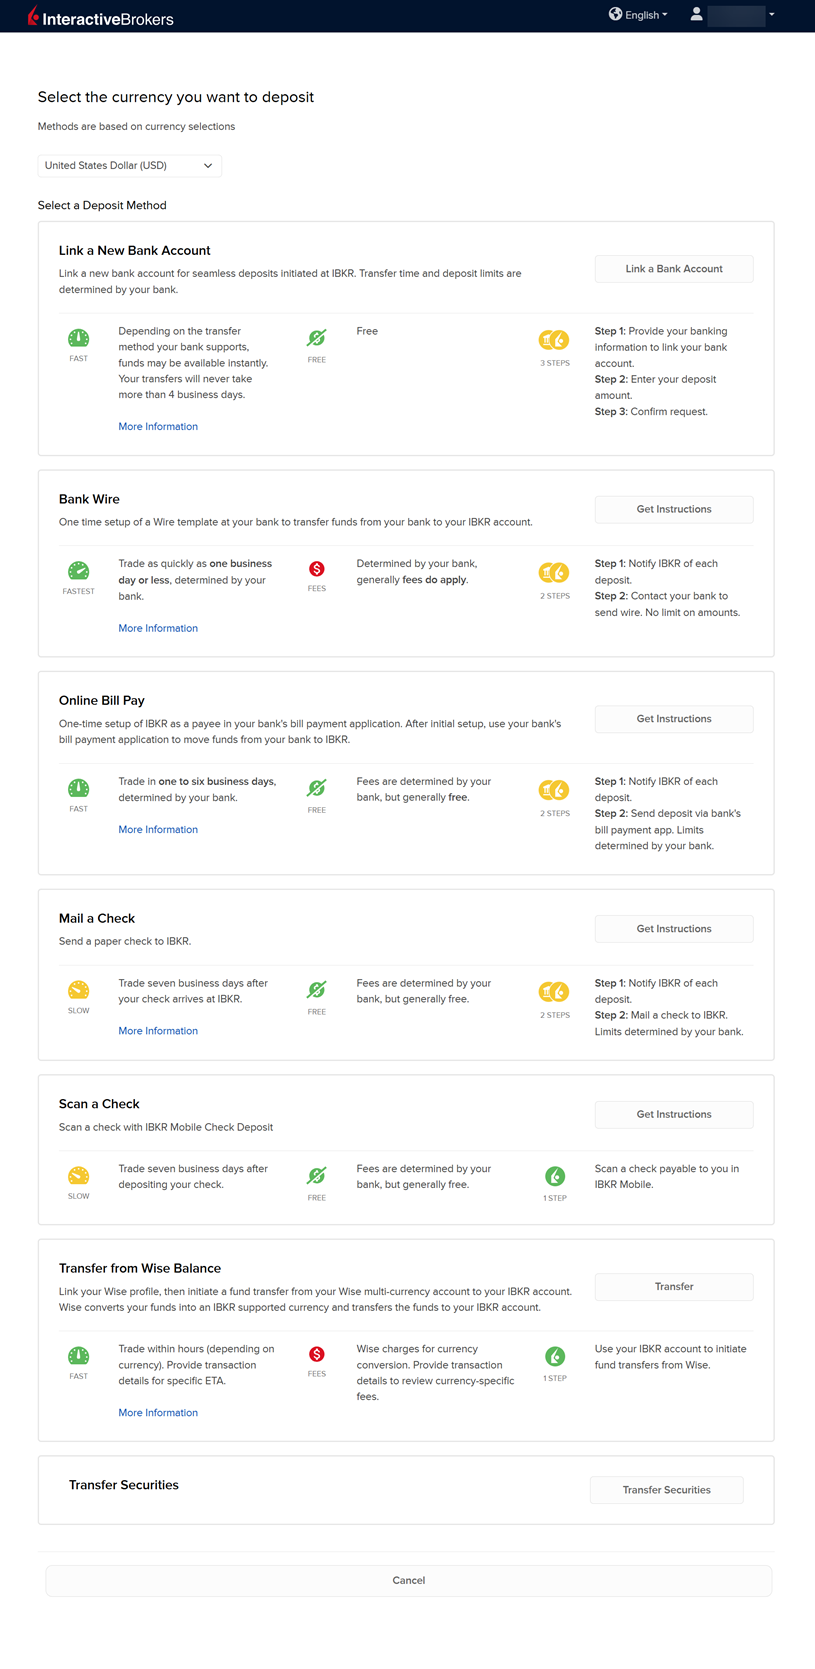
Funding your account during the application process is optional. However, doing so will push your application to a priority review. Funding your account may done by transferring cash from a bank account. Please note, funding Broker accounts is not required as you will use this account solely to manage and trade on behalf of your clients. If you would like to trade on your own behalf, you will need to open an account under your broker account. You may fund a broker account for other reasons such as subscribing and paying for Market Data and/or Research. To fund your account, please take the steps outlined below.
-
On the final page of the application, click the Fund Your Account button.
-
A list of transfer methods will populate on your screen. Click your desired transfer option.
-
Provide your bank details and complete the transfer request.