Configure Flex Web Service
Instructions
-
Click Performance & Reports followed by Flex Queries > Flex Web Service Configuration.
-
Alternatively, click Menu in the top left corner > Reporting > Flex Queries > Flex Web Service Configuration.
-
-
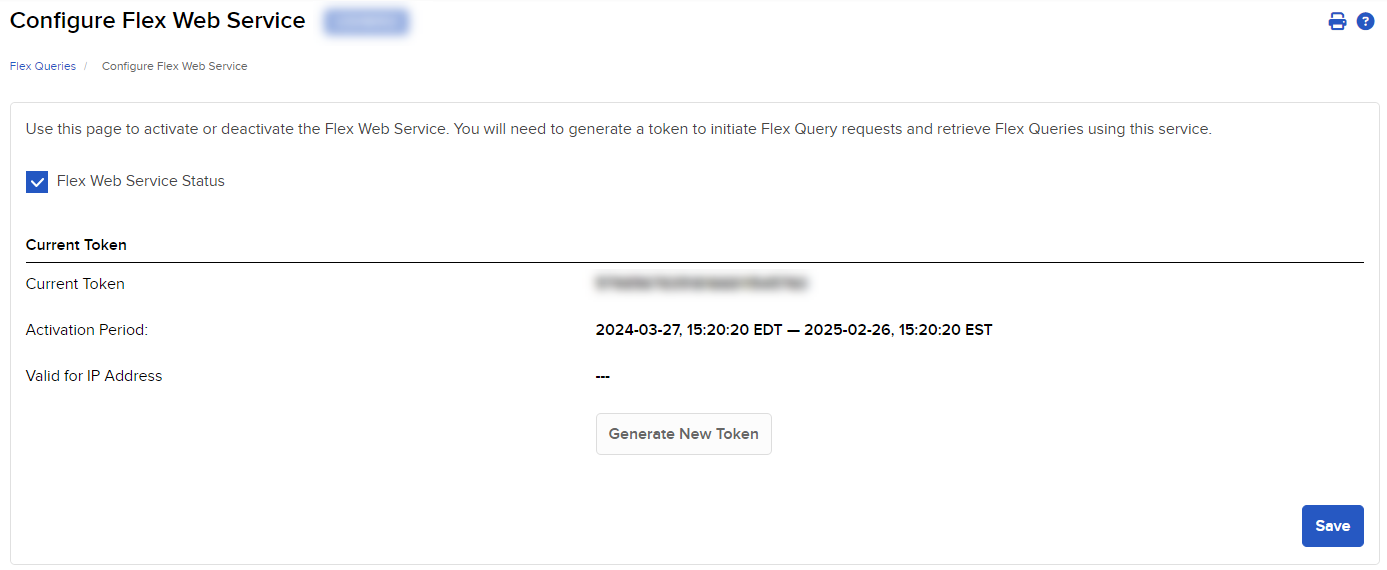
Activate the Flex Web Service by clicking the Flex Web Service Status check box, then Save.
The page refreshes, indicating a status of ACTIVE for the Flex Web Service, and lets you generate a confirmation number, which you will need to initiate Flex requests and retrieve Flex reports.

-
Generate a new token:
-
In the Should Expire After list, select the amount of time before the token expires. The token is valid for a 6 hour period by default.
-
In the Valid For IP Address field, enter an IP address to restrict the token to that address. If you leave this field blank, there will be no IP address restrictions.
-
Click Generate New Token.
The page refreshes, updating the Current Token Details section with information about your newly-generated token. Note that when you generate a new token, you invalidate the current one.
-
-
Initiate an automated Flex Web Service request:
- Make sure you have the following information:
Your current token (displayed in the Current Token Details section of the page.)
The Flex Query ID generated when you created the Flex query.
Programmatic access requires the User-Agent HTTP header to be set. Set the value to the Technology/Version used to access the service.
Examples: Java/1.8, Python/3.4.1, etc.
- Type one of the following URLs in your browser’s Address field:
Standard (Flex Configuration set in Portal)
https://ndcdyn.interactivebrokers.com/AccountManagement/FlexWebService/SendRequest?t=#######################&q=######&v=3
From Date / to Date Override (yyyymmdd- up to 365 days):
https://ndcdyn.interactivebrokers.com/AccountManagement/FlexWebService/SendRequest?t=#######################&q=######&fd=yyyymmdd&td=yyyymmdd&v=3
Period Override (up to 365 days)
https://ndcdyn.interactivebrokers.com/AccountManagement/FlexWebService/SendRequest?t=#######################&q=######&p=5&v=3
Where:
TOKEN is your current token.
QUERY_ID is the Flex Query ID.
v=3 specifies that you are using Flex Web Service Version 3. Note that if you do not specify a Version, the system will use Version 2.
You will receive an XML response containing the following information:
- Status - If the request was successful, Status will be Success. If the request was unsuccessful, Status will be Fail.
- Reference Code - If the request was successful, the XML response will contain a numeric reference code. This code will be used to retrieve the generated Flex query.
- Response URL - This is the URL to be used to retrieve the Flex report.
Here is a sample successful XML response Version 3:
<FlexStatementResponse timestamp="28 August, 2012 10:37 AM EDT">
<Status>Success</Status>
<ReferenceCode>1234567890</ReferenceCode>
<url>https://ndcdyn.interactivebrokers.com/AccountManagement/FlexWebService/GetStatement</url>
</FlexStatementResponse>
If the request was unsuccessful, the response will contain the following parameters:
<Status>Fail</Status>
<ErrorCode>XXXX</ErrorCode>
where XXXX = a numeric error code.
<ErrorMessage>TEXT</ErrorMessage>
Where TEXT is a text description of the specific error.
See Version 3 Error Codes for a list of all error codes and error messages.
Here is a sample unsuccessful XML response Version 3:
<FlexStatementResponse timestamp="28 August, 2012 10:37 AM EDT">
<Status>Fail</Status>
<ErrorCode>1012</ErrorCode>
<ErrorMessage>Token has expired.</ErrorMessage>
</FlexStatementResponse>
- Retrieve the Flex data:
- Be sure you have your current token number and the reference code you received as part of the response to your initial request.
-
Type one of the following URLs in your browser’s Address field:
-
Standard (Flex Configuration set in Portal)
https://ndcdyn.interactivebrokers.com/AccountManagement/FlexWebService/SendRequest?t=#######################&q=######&v=3
-
From Date / to Date Override (yyyymmdd- up to 365 days):
https://ndcdyn.interactivebrokers.com/AccountManagement/FlexWebService/SendRequest?t=#######################&q=######&fd=yyyymmdd&td=yyyymmdd&v=3
-
Period Override (up to 365 days)
https://ndcdyn.interactivebrokers.com/AccountManagement/FlexWebService/SendRequest?t=#######################&q=######&p=5&v=3
Where:
REFERENCE_CODE is the code you received as part of the response when you placed the request.
TOKEN is your current token.
VERSION is the version of the Flex Web Service Version you are using. You can set this to 2 or 3. Note that if you do not specify a Version, the system will use Version 2. -
You will receive the Flex data if the request was successful. If not, you will receive an XML-based response informing you that the request was invalid. The example below shows an unsuccessful request to retrieve the Flex data using Version 3:
<FlexStatementResponse timestamp="28 August, 2012 10:37 AM EDT">
<Status>Fail</Status>
<ErrorCode>1015</ErrorCode>
<ErrorMessage>Token is invalid.</ErrorMessage>
</FlexStatementResponse>